A multi-step form exists because long forms scare people off. A quote request, an onboarding questionnaire or a booking form with fifteen fields on one screen feels like homework, and visitors leave before they start. Splitting the same fields into short steps with a progress bar makes the form feel lighter, and each step only asks for one thing at a time.
The catch: the native Bricks Builder Form element has no steps, no progress bar and no per-step validation. In this guide you’ll see your options, then build a complete three-step form inside Bricks using the Pro Forms module in Djia Bricks, with no custom JavaScript.
Does Bricks Builder support multi-step forms natively?
Not at the time of writing. The native Form element covers the essentials (text, email, select, checkbox, date picker, file upload) and useful actions such as email, redirect, webhook and user registration. But it has no concept of steps. Multi-step support has been one of the longest-running requests on the Bricks community forum, and the usual answer is still a workaround.
Your options for multi-step forms in Bricks
| Approach | Pros | Cons |
|---|---|---|
| Native Form + custom JavaScript | No extra plugin | You maintain the script; validation, progress and accessibility are on you |
| A general form plugin (embedded via shortcode) | Mature form features | Styled outside Bricks, so it rarely matches your design system; extra assets on every page |
| A Bricks-native form addon (e.g. Djia Bricks Pro Forms, Bricksforge) | Every field and step is a Bricks element you style with your own classes and variables | Requires a premium addon |
If the form is part of your design and you care about it matching the rest of the site, a Bricks-native addon is the least friction. The rest of this tutorial uses Djia Bricks Pro Forms.
What the multi-step form will do
A three-step project quote form for an agency site:
- About you: name and email
- Your project: project type (card radio) and budget (range slider)
- Review and send: a summary of the answers, an acceptance checkbox and the submit button
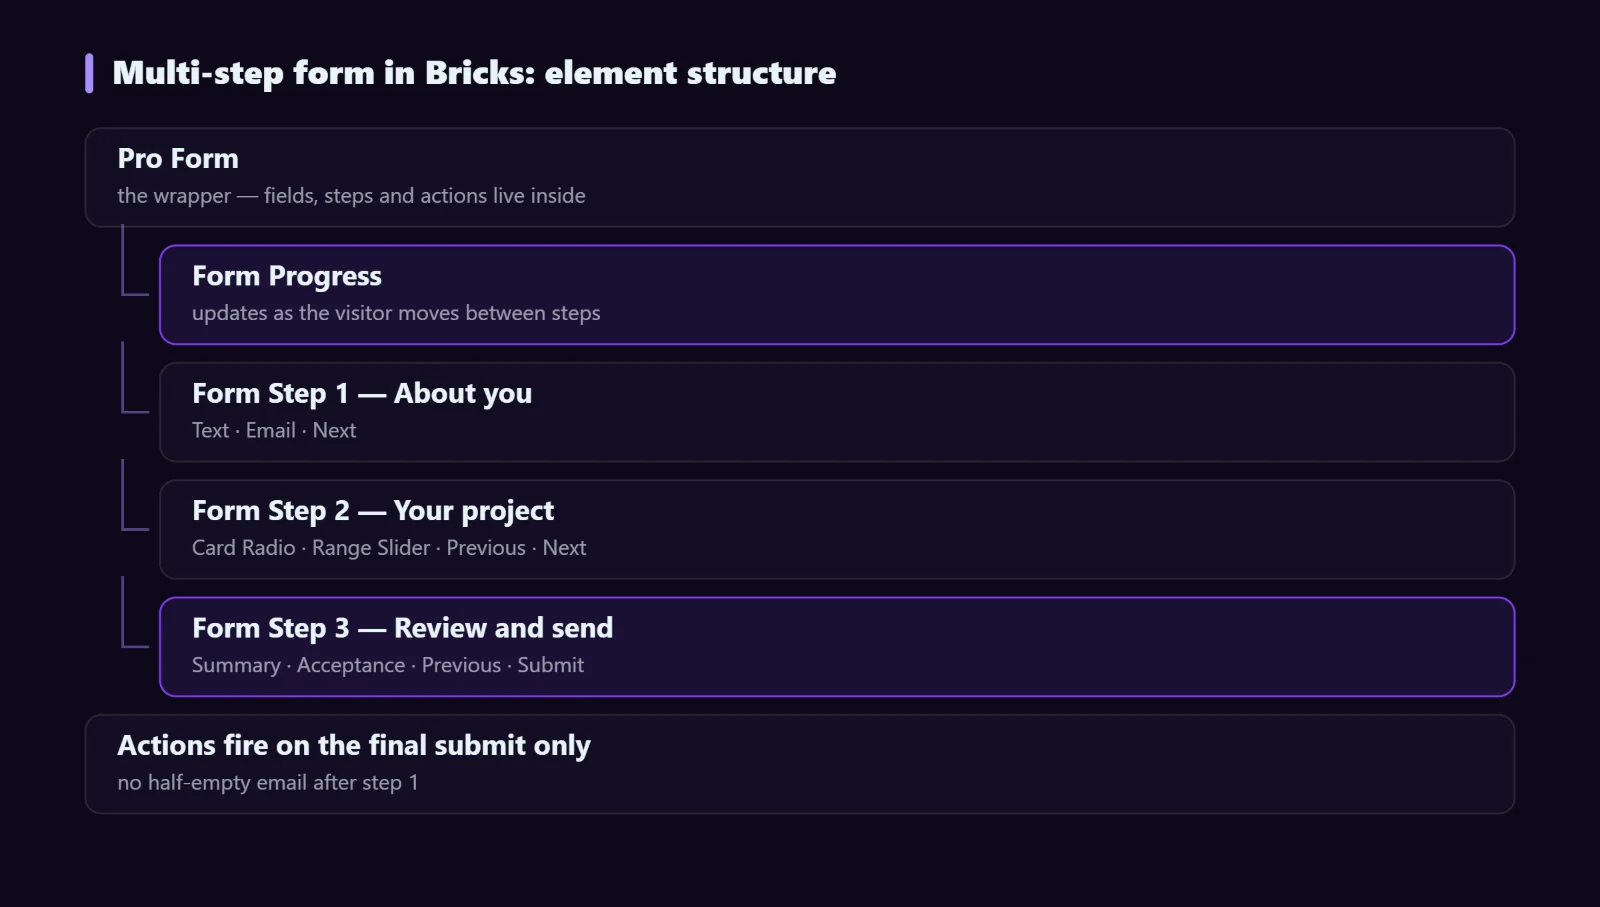
Here is the element structure you’ll end up with:
Step-by-step: build a multi-step form in Bricks
1. Enable the Pro Forms module
In the WordPress admin, open the Djia Bricks modules panel and switch on Pro Forms. Modules you leave off load no code at all, so you only pay for what you use. If this is a fresh install, the getting started guide walks through activation.
2. Add the Pro Form wrapper
Open your page in Bricks and drag the Pro Form element onto the canvas. This is the container for everything else: fields, steps, the submit button and the post-submit actions all live inside it.
3. Add a progress bar
Drop a Form Progress element as the first child of the form. It updates automatically as the visitor moves between steps. Style it like any other Bricks element: height, colors, radius, or a global class you already use.
4. Create the steps
Add three Form Step elements below the progress bar. Each Form Step is one screen of the form. Then fill them:
- Step 1: a Text Field for the name and an Email Field. Mark both as required.
- Step 2: a Card Radio for the project type (website, online store, redesign) and a Range Slider for the budget.
- Step 3: a Form Summary field so people can check their answers, and an Acceptance field for your privacy policy.
Pro Forms has 48 field types in total. Beyond these you can use signature, file upload, date and time, image radio, repeaters and payment fields.
5. Add navigation buttons
Inside each step, add the buttons that move the visitor forward and back:
- Form Step Next at the end of steps 1 and 2
- Form Step Previous in steps 2 and 3
- Form Submit only in the last step
Label them clearly. “Continue to project details” converts better than a bare “Next”, because the visitor knows what’s coming.
6. Set up validation
Set the validation rules on each field: required, email format, minimum length and so on. Pro Forms validates per step, so a visitor can’t move to step 2 with an empty or invalid email in step 1. Errors show up where the problem is, not three screens later.
7. Configure what happens on submit
Select the Pro Form element and open the Actions tab. Add an Email action to notify your team, and optionally a CRM action (HubSpot, Mailchimp, ActiveCampaign and others) or a Webhook. You can chain as many actions as you need, and each one can run only when certain field values match.
One detail that saves a lot of confusion: actions only fire on the final submit, not each time someone clicks Next. You won’t get a half-empty email when a visitor finishes step 1.
Going further: conditional steps, pricing and payments
- Conditional fields: wrap fields in a Conditional Wrapper to show them only when an earlier answer matches. For example, ask for the store’s product count only if the project type is “Online store”.
- Live price estimates: use Calculation and Live Value fields to show an estimated price as the visitor changes options, which works well for quote forms.
- Take payment in the last step: add a Payment Field and the Stripe action to charge a fixed or calculated amount, or send the visitor to PayPal. Stripe needs HTTPS.
- Generate a PDF: the Create PDF action can turn the submission into a branded PDF and email it or save it.
Multi-step form UX tips that raise completion
- Keep it to three to five steps. More than that and the progress bar starts working against you.
- Start with the easiest question. Once someone has answered one question, they’re more likely to finish.
- One topic per step. Contact details, then project details, then review. Don’t mix them.
- Always offer a way back. A Previous button that keeps the answers makes people less anxious about mistakes.
- Test on a phone first. Card radios and range sliders are much easier to tap than long dropdowns.
Troubleshooting
The Next button doesn’t move to the next step
Almost always a validation rule: a required field in the current step is empty or invalid. Check that required fields are actually inside the step they belong to.
I’m not receiving emails after a step
That’s expected. Actions run once, on the final submit. If the final submit doesn’t send email either, check your site’s mail delivery (an SMTP plugin fixes most cases).
Stripe field doesn’t appear
Stripe won’t load over plain HTTP. Make sure the page is served over HTTPS and your API keys are set in the Djia Bricks settings.
FAQ
Can I use Pro Forms and the native Bricks form on the same site?
Yes. Pro Forms doesn’t replace or conflict with the native Form element, so existing forms keep working.
Do I need to write any JavaScript?
No. Steps, navigation, the progress bar and validation are all configured from the Bricks controls panel.
How many steps can a form have?
As many as you add Form Step elements. For conversions, three to five is usually the sweet spot.
Build your first multi-step form
Pro Forms is one of 15 modules in Djia Bricks, included in every plan alongside AJAX filters, the WooCommerce builder and 400+ elements. See the full field and action list on the Pro Forms page, read the Pro Forms documentation, or pick a license and start building.