A Bricks WooCommerce checkout solves the page where a store earns or loses the sale, and it is the page WooCommerce gives you least control over. The default template is a form built from hooks: to move a field, add a trust badge or change the order of the sections, you are writing PHP against woocommerce_checkout_fields and a dozen action hooks, then hoping the next WooCommerce update does not move them.
The Checkout Builder module turns each part of checkout into a Bricks element you place and style yourself. This guide builds a one-page checkout with billing, shipping, order bumps and a styled place-order button.
Before you start: what not to change
A Bricks WooCommerce checkout rebuilds the layout only. Validation, tax calculation, shipping rates, payment gateways and order creation stay with WooCommerce. That is the right split — a custom checkout that reimplements validation is a checkout that will quietly drop orders.
Two rules worth writing down before you touch anything:
- Never cache the checkout page. Exclude cart, checkout and my-account from full-page caching. A cached checkout serves one customer’s session to another.
- Test a real order end to end on every change, including a failed payment. The failure path is where custom checkouts break.
The 12 Bricks WooCommerce checkout elements
| Element | What it does |
|---|---|
| Billing Fields | Every billing address field, as individual Bricks elements you can reorder |
| Billing Address Selector | Saved addresses for returning customers |
| Shipping Fields | The shipping address block |
| Shipping Address Selector | Saved shipping addresses |
| Shipping Methods | Available rates for the entered address |
| Shipping Calculator | Postcode-based estimate before the address is complete |
| Payment Methods | The gateway picker |
| Place Order Button | Submit, with a loading state |
| Bank Details | BACS transfer details for that payment method |
| Add Order Bumps | Upsell products shown during checkout |
| Content Updater | Updates a section’s content dynamically as the order changes |
| Checkout Hooks | Injects content at any WooCommerce checkout hook |
The last one is the escape hatch. If a payment or tax plugin expects to render at a specific WooCommerce hook, drop a Checkout Hooks element at that position and its output appears where it should.
Step-by-step
1. Enable the module and create the template
Switch on Checkout Builder in the Djia Bricks modules panel, then create a Bricks template for the checkout page. Put a real product in your cart before you start editing — an empty cart means an empty checkout and nothing to lay out.
2. Lay out two columns
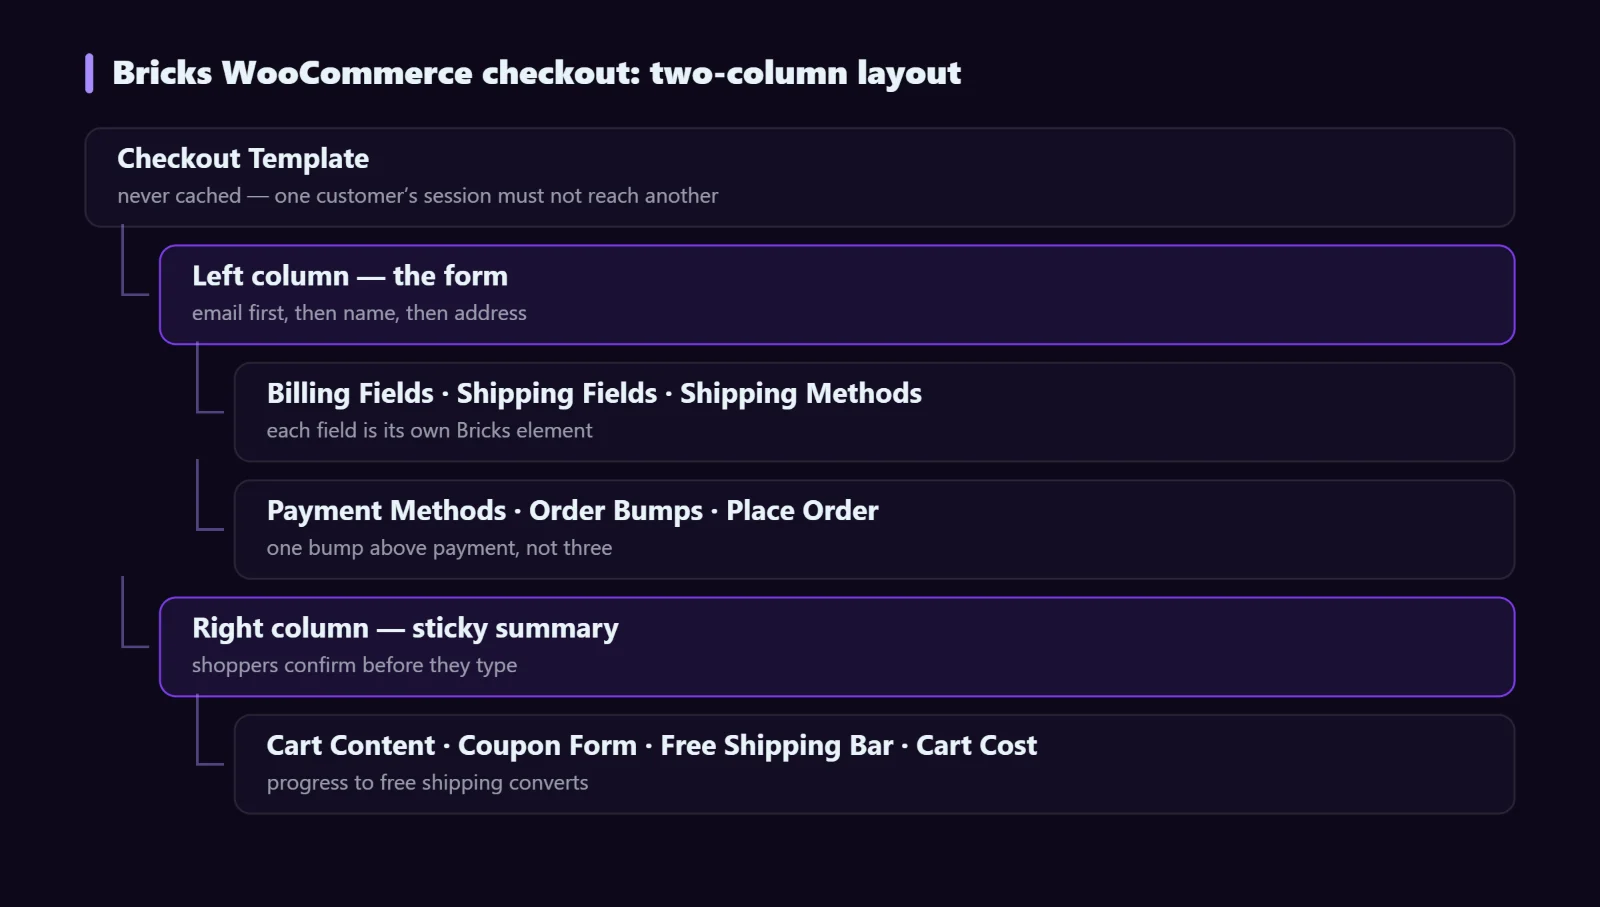
The layout that consistently performs: form on the left, order summary sticky on the right, collapsing to a single column under about 900px with the summary moved to the top as a collapsible row. Shoppers want to confirm what they are buying before they type an address.
3. Place and prune the billing fields
Because each field is its own element, you remove a field by deleting the element rather than by filtering an array in PHP. Be careful which ones you drop: a field that WooCommerce treats as required but which is not on the page produces a checkout that fails validation with no visible error. If you want a field gone, mark it not-required in the WooCommerce settings as well.
The biggest easy win here is field order. Email first, then name, then address. Asking for a phone number before an email costs you the ability to follow up on an abandoned checkout.
4. Add the order summary
From the cart element set: Cart Content for the line items, Cart Cost for subtotal, tax and total, Coupon Form and Applied Coupons, and Free Shipping Bar — the progress bar showing how much more is needed to qualify. That bar is one of the few upsell mechanics that shoppers genuinely appreciate.
5. Add order bumps, carefully
The Add Order Bumps element shows an offer inside checkout. One bump, placed just above the payment section, is the pattern that works. Three bumps is a page that feels like a trap, and the measurable result is usually a lower completion rate, not a higher average order value.
6. Style the place-order button like it matters
Full width, high contrast, with the loading state visible. Label it with the action and the amount — “Pay 149 USD” outperforms “Place order”, because it removes the last moment of doubt about what is about to happen.
Conditional checkout content
With the Conditions module, parts of checkout can respond to the order:
- Hide the shipping block entirely when the cart is only downloadable products.
- Show a “free shipping unlocked” message once the cart total crosses the threshold.
- Show a VAT number field only for customers in specific countries.
- Show a returning-customer address selector only to logged-in users.
The My Account page
Checkout’s neglected sibling. The My Account Builder module lets you map any account endpoint — orders, downloads, addresses, edit account — to its own Bricks template, add custom navigation items, and reorder or hide the default WooCommerce menu items, with no PHP. If you sell licences or subscriptions, this is where a custom endpoint pays off.
Troubleshooting
Checkout submits and nothing happens
A required field is missing from the layout, so validation fails with an error that has nowhere to render. Add the field back, or make it optional in WooCommerce settings.
Shipping methods do not refresh
WooCommerce refreshes rates over AJAX when address fields change. If a script optimiser defers or combines the checkout script, that stops. Exclude WooCommerce scripts from optimisation on this page.
Totals are wrong for one customer only
Almost always page caching. Confirm cart, checkout and my-account are excluded at every layer — plugin cache, server cache and CDN.
A payment gateway’s fields are missing
The gateway renders at a hook your layout no longer outputs. Place a Checkout Hooks element at the right position to restore it.
FAQ
Does this work with any payment gateway?
Gateways that register through the standard WooCommerce payment API work normally. Gateways that replace the whole checkout with their own hosted flow bypass the layout entirely, by design.
Can I build a multi-step checkout?
Yes, by grouping the elements into steps. Measure it rather than assuming: multi-step reduces the perceived effort on long forms, and adds friction on short ones.
What happens if I disable the module later?
Checkout falls back to the standard WooCommerce template. Orders are unaffected — the layout is presentation only.
Next steps
Checkout Builder is one of six WooCommerce modules in Djia Bricks, all included in every licence. See the WooCommerce feature page for the complete element list, the documentation for setup detail, or start with the product page guide if you have not customised that yet.